Migrating ASP.NET applications to another Windows Domain

You may have to migrate Intranet software applications to another Windows Domain (e.g. Due to company restructure). As Intranet applications normally uses Domain account to authorize user access, changing domain means you have to change user group settings, sometimes source code and sometimes even worse your third-party applications will not work properly -- e.g. old data uses old domain account so that user cannot change their data using new domain account.

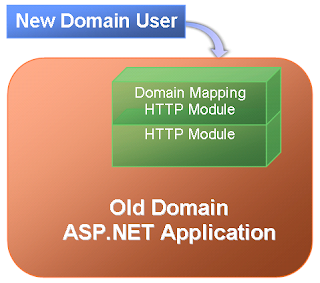
If your applications were based on ASP.NET framework, then there is a simple solution to ease the pain at least temporarily: you keep all those ASP.NET applications in original domain and add a HttpModule (defined in web.config) to map new domain account to old domain account. When users in new domain access those applications in old domain, the ASP.NET application will only see the old domain account so the users still work in the exact same way as before.


The main code logic for domain mapping HttpModule is as below:

// Get user's domain account
string strDomainUserAccount = HttpContext.Current.User.Identity.Name.ToUpper();

// Remove domain name from the account
string strUserAccount = strDomainUserAccount;
if (strDomainUserAccount.StartsWith("NewDomain\\")) {
 strUserAccount = strUserAccount.Substring(10);
}

// Fetch cached user mappings
Dictionary userMap = (Dictionary)HttpRuntime.Cache(USER_CACHE_KEY);
if (userMap == null) {
 // If no cache is available, reload the cache from database 
 // and try to get the item again
 this.ReloadUserMap();
 
 userMap = (Dictionary)HttpRuntime.Cache(USER_CACHE_KEY);
 if (userMap == null) {
  // Throw exception here!!
  return;
 }
}

// Get user's NTUserName from the mapping in cache 
// and create a new user for Http context
if (userMap.ContainsKey(strUserAccount)) {
 string strNewAccount = userMap[strUserAccount];
 
 if (!string.IsNullOrEmpty(strNewAccount)) {
  // New Identity
  string strAuthenticateType = HttpContext.Current.User.Identity.AuthenticationType;
  System.Security.Principal.GenericIdentity newID = 
   new System.Security.Principal.GenericIdentity(strNewAccount, strAuthenticateType);
  
  // Get cached roles in mapped domain. 
  // If no cache is available, get from AD and put into cache
  string[] strRoles = this.GetDomainGroupsForUserFromCache[strNewAccount];
  System.Security.Principal.GenericPrincipal newP = 
   new System.Security.Principal.GenericPrincipal(newID, strRoles);
  
  HttpContext.Current.User = newP;
 }
}
FlowLayoutPanel for .NET Compact Framework

It is quite complex to arrange Windows Form layout dynamically in .NET Compact Framework (CF) when you try to show/hide a control between other controls. Although you can use FlowLayoutPanel in desktop Windows Form application, there is no such kind of layout manager for CF.

I found an old article on CodeProject about FlowLayoutPanel, but that code cannot work on CF because CF Panel does not have OnLayout event. Also the code logic has bugs too.

After searching for a while, I decided to make a FlowLayoutPanel for CF by myself. It turns out the code is not hard to write:

Protected Overloads Overrides Sub OnPaint(ByVal pEvent As PaintEventArgs)
 Dim nextTop As Integer = 0, nextLeft As Integer = 0
 Dim maxHeight As Integer = 0
 Dim ParentWidth As Integer
 
 If Me.Parent IsNot Nothing Then
  ParentWidth = Me.Parent.Width
 Else
  ParentWidth = Me.Width
 End If

 ' Modify control location for the layout
 For Each myControl As Control In Me.Controls
  ' Ignore invisible controls
  If myControl.Visible = False Then
   Continue For
  End If

  If (nextLeft + myControl.Width) > ParentWidth Then
   nextTop += maxHeight
   nextLeft = 0
   ' Reset maxHeight
   maxHeight = 0
  End If

  myControl.Top = nextTop
  myControl.Left = nextLeft

  If myControl.Height > maxHeight Then
   maxHeight = myControl.Height
  End If

  nextLeft += myControl.Width
 Next
 Me.AutoScrollPosition = New System.Drawing.Point(0, 0)

 MyBase.OnPaint(pEvent)
End Sub

Below is a sample using the logic above:


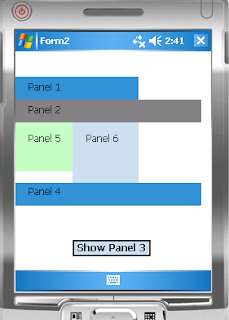
To make layout easier, I put several panels inside the FlowLayoutPanel. You can see all the controls are arranged properly. When I click the "Hide Panel 3" button, the Form becomes this:


The controls below Panel 3 are moved up automatically. If I click "Show Panel 3" button, the Panel 3 will be displayed at original place and all the controls below it are moved down accordingly.

The code for the button is like below:

Private Sub btnHide_Click(ByVal sender As Object, ByVal e As EventArgs)
 If btnHide.Text = "Hide Panel 3" Then
  Panel3.Visible = False
  btnHide.Text = "Show Panel 3"
 Else
  Panel3.Visible = True
  btnHide.Text = "Hide Panel 3"
 End If

 ' Refresh the flow layout panel
 Me.FlowLayoutPanel1.Invalidate()
End Sub

There is a small problem in Visual Studio though: when you drag-drop a control to the FlowLayoutPanel, Visual Studio always puts the control as the first one inside the FlowLayoutPanel. You need to modify the designer file to manually put those controls in order:

'FlowLayoutPanel1
'
Me.FlowLayoutPanel1.Controls.Add(Me.Panel1)
Me.FlowLayoutPanel1.Controls.Add(Me.Panel2)
Me.FlowLayoutPanel1.Controls.Add(Me.Panel3)
Me.FlowLayoutPanel1.Controls.Add(Me.Panel5)
Me.FlowLayoutPanel1.Controls.Add(Me.Panel6)
Me.FlowLayoutPanel1.Controls.Add(Me.Panel4)